
Why Is My Bottom of dishwasher full of water fix? (And How to Fix It Fast)
It’s a moment that ruins the clean-kitchen feeling: you open the dishwasher expecting sparkling dishes, but instead, you find a pool of murky, stagnant water at the bottom. If you are searching for a “Why Is My Bottom of dishwasher full of water fix?” you’ve come to the right place.
Before you pick up the phone to call a repair service, know this: the vast majority of drainage issues are caused by simple blockages you can fix yourself in minutes. This guide will walk you through the diagnostic process, starting with the most common and easiest fix.
Start Here: The 5-Minute Fixes for a Dishwasher That Won’t Drain
When a dishwasher won’t drain, the problem is almost always a clog preventing water from leaving the tub. Your machine’s drainage system is a series of components, and the blockage can happen at several points.
But troubleshooting is a process of elimination, and we will start with the number one offender, which is responsible for more than half of all drainage service calls. Don’t worry about the drain pump or complex plumbing yet. Your first move is always to check the filter.
Your First Check: Cleaning the Dishwasher Filter
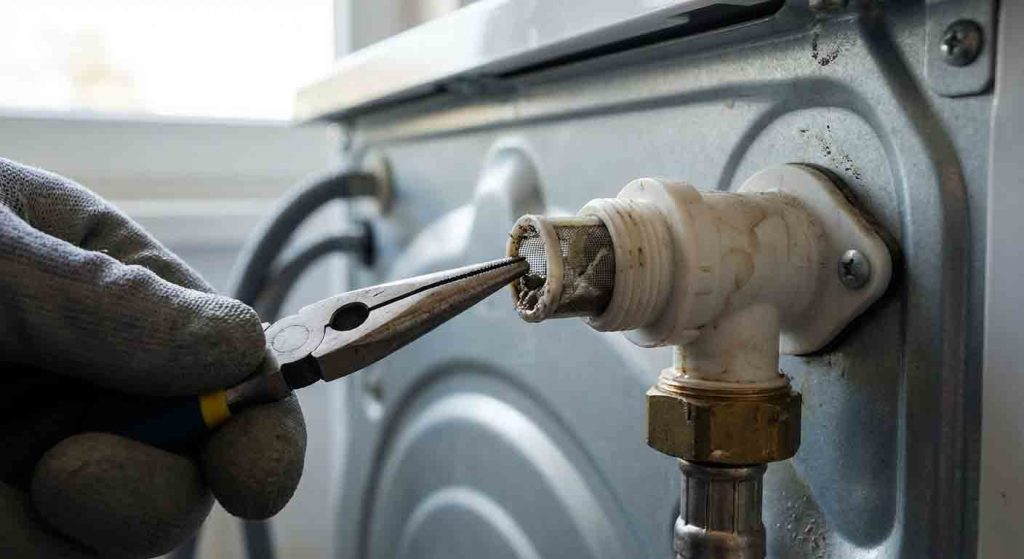
The dishwasher filter is the unsung hero of your appliance. Its only job is to catch food particles, debris, and foreign objects to prevent them from reaching and destroying the drain pump.
When it does its job too well, it becomes clogged and water can no longer pass through. According to home maintenance experts at The Spruce, a clogged filter is the most frequent cause of standing water.
You’ll likely feel a gritty, slimy film on the mesh—this is a combination of food residue and detergent buildup. Cleaning it is simple, satisfying, and usually solves the problem instantly.
Step-by-Step Guide to Cleaning the Filter:
- Remove the Bottom Rack.Pull the bottom dish rack all the way out and set it aside. This gives you clear access to the floor of the dishwasher.
- Locate the Filter Assembly.Look at the bottom of the tub. You will see a cylindrical, usually plastic, component. This is the upper filter. It may have arrows indicating which way to turn it.
- Remove the Upper Filter.Firmly grip the upper filter and twist it counter-clockwise (to the left). It should unlock after a quarter or half turn. Once unlocked, you can lift it straight up and out.
- Remove the Lower Filter.Underneath, you will find the lower filter, which is a flat mesh screen. In most models, this can simply be lifted out. It may require a slight forward pull.
- Thoroughly Clean Both Parts.Take both filter parts to the sink. Rinse them under hot, running water to remove all visible food chunks and grime. Use a soft brush (an old toothbrush works perfectly) and a bit of dish soap to gently scrub the mesh screens. Do not use a wire brush or abrasive scouring pad, as this will damage the filter.
- Clean the Filter Housing.While the filters are out, use a damp cloth to wipe out the filter housing area in the bottom of the dishwasher.
- Reinstall the Filters.First, place the lower filter back into its housing, ensuring it sits completely flat. Next, insert the upper filter into the opening, and turn it clockwise (to the right) until it drops and locks firmly into place. It should not feel loose.
Pro-Diagnostic Tip: If your filter is relatively free of food but covered in a thick, white, or chalky slime, you are likely using too much detergent. That slime is undissolved soap, which can also cause drainage issues. Try cutting back on the amount of detergent you use per cycle.
If cleaning the filter doesn’t solve the problem, the next step is to check the drain hose for kinks or clogs, which we will cover in Section 2.
| Filter Cleaning Checklist | Status |
| 1. Bottom rack removed | ☐ |
| 2. Upper filter twisted and removed | ☐ |
| 3. Lower filter lifted out | ☐ |
| 4. Both filters scrubbed with a soft brush | ☐ |
| 5. Filter housing wiped clean | ☐ |
| 6. Lower filter reinstalled flat | ☐ |
| 7. Upper filter reinstalled and locked | ☐ |
Seasonal Intelligence: Be extra vigilant about filter cleaning after heavy-use periods like holidays. Large family meals often produce greasier, starchier food residue (from things like mashed potatoes and gravy) that can clog a filter much faster than everyday use. A quick filter check after a holiday gathering can prevent a frustrating backup.
Preventive Actions Checklist
- Scrape, Don’t Rinse:Scrape large food chunks off plates before loading, but there’s no need to pre-rinse. Dishwasher detergent is designed to cling to food particles to work effectively.
- Clean the Filter Monthly:Set a recurring calendar reminder to clean your filter on the first of every month. It only takes a few minutes and is the best prevention.
- Run a Cleaning Cycle:Once a month, run an empty cycle with a cup of white vinegar or a specialized dishwasher cleaner to break down grease and mineral buildup throughout the system.
Intermediate Fixes: Tackling Hoses and a Clogged Garbage Disposal
If you’ve thoroughly cleaned your dishwasher’s filter and are still staring at a pool of standing water, don’t get discouraged. The clog is simply further down the line. The next place to investigate is the drain hose and its connection to your sink’s plumbing. These steps require a few basic tools and a willingness to look under your sink, but they are straightforward and solve the vast majority of remaining drainage problems.
Your Second Check: The Drain Hose and Garbage Disposal Connection
The water leaving your dishwasher travels through a single drain hose that connects to your household plumbing, usually at the garbage disposal or the sink drain. This area is a prime spot for blockages. Before you start disconnecting anything, perform a quick visual check.
- Check for Kinks:Pull the dishwasher out a few inches from the cabinet and use a flashlight to look behind it. Ensure the drain hose isn’t sharply kinked or pinched, as this can stop water flow completely.
- Run the Garbage Disposal:If your dishwasher drains into a garbage disposal, run it for 30 seconds with cold water. Sometimes, food waste inside the disposal unit can block the dishwasher’s drain inlet, and simply running it will clear the path.
If these quick checks don’t work, it’s time to investigate the connection point.
The Most Overlooked Problem: The Garbage Disposal Knockout Plug
This applies specifically if you have a newly installed garbage disposal. If your dishwasher fails to drain on the very first use after a new disposal is put in, the cause is almost certainly the knockout plug.
Manufacturers ship disposals with a plastic plug sealing the dishwasher inlet because not everyone connects a dishwasher to it. The installer is supposed to “knock out” this plug during installation. It is an incredibly common and frustrating oversight.
How to Remove a Knockout Plug:
- SAFETY FIRST: Disconnect Power.Unplug the garbage disposal from the wall or turn off its power at the circuit breaker.
- Disconnect the Drain Hose.Use a screwdriver or pliers to loosen the metal clamp holding the drain hose to the disposal’s inlet nozzle. Pull the hose off.
- Feel for the Plug.Stick your finger inside the inlet nozzle. If you feel a solid plastic wall, the plug is still there.
- Knock It Out.Place the tip of a flat-head screwdriver on the edge of the plug. Firmly tap the screwdriver’s handle with a hammer until the plug pops out and falls into the disposal’s main chamber.
- CRITICAL: Retrieve the Plug.You MUST remove the plastic plug from inside the disposal. Use pliers or tongs to reach in through the sink drain and pull it out. If you don’t, it will cause a horrible racket and jam the disposal.
- Reconnect the Hose.Reattach the drain hose and tighten the clamp.
Clearing a Clogged Drain Hose or Air Gap
If the knockout plug isn’t your issue, you likely have a standard clog in the drain line. You may also have an air gap—a small chrome cylinder on your sink deck that can get clogged. If water spurts out of the air gap when the dishwasher runs, it’s clogged.
Step-by-Step Guide to Clearing the Hose:
- Prepare for Water.Place a bucket or a shallow pan under the sink where the drain hose connects to the disposal or sink drain. Have towels
- Disconnect the Hose.Loosen the clamp and pull the drain hose off the inlet nozzle. Let any trapped water and debris drain into the bucket.
- Clear the Air Gap (if you have one).Unscrew the chrome cover from the air gap on your sink. Clean out any gunk you see inside with a paper towel. The clog is often in the larger hose running from the air gap to the disposal. Disconnect it and clean it out.
- Inspect and Clear the Hose.With the hose disconnected, you can now clear it.
- The Sensory Check:You will likely smell a foul odor. Look inside the hose; it’s probably coated with a slimy, gray or black gunk. This is normal buildup.
- Use a Tool:Use a flexible drain brush or a straightened wire coat hanger to gently push through the hose and clear the blockage. You’ll be surprised at what comes out.
- Flush It Out:Take the hose and flush it with hot water in a bathtub or utility sink to remove any remaining residue.
- Reconnect with a High Loop.When you reattach the hose, make sure to create a “high loop.” This means the hose should go up as high as possible under the sink before it loops back down to the disposal. This crucial step uses gravity to prevent dirty sink water from flowing back into your dishwasher. Secure the loop to the underside of the countertop with a strap or clamp.
What Common Advice Gets Wrong: Never, ever pour chemical drain cleaners into your dishwasher. These harsh chemicals can damage the plastic and rubber components of the appliance, including seals and hoses, leading to leaks and permanent damage that will not be covered by your warranty. Mechanical cleaning is the only safe way.
| Under-Sink Troubleshooting Checklist | Status |
| 1. Power to disposal disconnected | ☐ |
| 2. Bucket and towels in place | ☐ |
| 3. Drain hose checked for kinks | ☐ |
| 4. Garbage disposal run to clear debris | ☐ |
| 5. Knockout plug checked/removed (new install) | ☐ |
| 6. Drain hose disconnected and cleared | ☐ |
| 7. Air gap cleaned (if applicable) | ☐ |
| 8. Hose reinstalled with a high loop | ☐ |
Preventive Actions Checklist of Why Is My Bottom of dishwasher full of water
- Run Disposal Before Dishwasher:Always run your garbage disposal for a few seconds before starting the dishwasher to ensure the drain path is clear.
- Avoid Stringy Foods:Be mindful of putting fibrous, stringy foods like celery or banana peels down the disposal, as these are notorious for causing clogs.
- Use Hot Water:When using your disposal, always run cold water, but running a bit of hot water down the sink drain after use can help flush grease from the pipes your dishwasher shares.
Diagnosing and Dealing with a Failed Drain Pump
You’ve done the hard work: you cleaned the filter, and you cleared the drain hose and its connections under the sink. If your dishwasher still refuses to drain, the problem lies at the heart of the drainage system: the drain pump. This component is responsible for physically pushing the water out of the machine. While a pump failure sounds intimidating, it’s a mechanical part that can be diagnosed with your ears and, if necessary, a simple tool. This section will guide you through the final steps of troubleshooting.
Your Final Check: Diagnosing the Drain Pump by Sound
At this stage, your ears are your best diagnostic tool. The sounds the dishwasher makes—or fails to make—during the drain cycle will tell you exactly what’s wrong with the pump. Start a drain-only or rinse cycle and listen carefully.
Pro-Diagnostic Tip: The drain cycle usually happens at the very beginning and very end of a full wash cycle. You can often force it to start by pressing “Start” and then “Cancel,” which typically triggers the machine to drain any water.
| Drain Pump Diagnostic Sounds | Likely Cause | What It Means |
| Loud Humming or Buzzing | Jammed Impeller | The motor is getting power and trying to work, but a foreign object is physically blocking the spinning impeller blade. |
| Grinding, Squealing, or Droning | Failing Motor Bearings | The motor itself is wearing out. The pump is destroying itself and will fail completely very soon. |
| Complete Silence or a Faint Hum | Burned-Out Motor | The motor is dead and not receiving or responding to electrical power. It needs to be replaced. |
How to Manually Clear a Jammed Impeller
A humming sound is actually good news. It means the motor works, and you just need to remove the object blocking it. This is the most common type of pump failure.
- SAFETY FIRST: Disconnect All Power.This is not optional. Unplug the dishwasher from the wall outlet or, even better, turn off the corresponding breaker in your home’s electrical panel.
- Access the Underside.You will need to pull the dishwasher out from under the counter. It’s usually secured by two small screws attaching it to the countertop. Once they’re removed, you can carefully slide the unit out. You may need to disconnect the water supply line.
- Tilt the Dishwasher.Place old towels on the floor behind the dishwasher. Carefully tilt the machine backward so it rests against the wall, giving you access to its underside.
- Locate the Drain Pump.You will see the drain pump mounted to the bottom of the main sump. It’s the component where the corrugated drain hose you cleaned earlier connects.
- Disconnect the Hose and Inspect.Place towels to catch residual water. Use pliers to loosen the clamp holding the drain hose to the pump and pull the hose off. Now, look inside the pump’s outlet nozzle for any visible debris.
- Feel for the Obstruction.The impeller is a small plastic spinner inside the pump. Do not use your fingers. Use needle-nose pliers or a screwdriver to reach into the housing and feel the impeller. Try to spin it. If it doesn’t move freely, you’ve found the jam. Carefully work the object—usually a piece of glass, a fruit pit, a bone fragment, or a plastic twist-tie—out of the impeller blades.
- Reassemble and Test.Once the impeller spins freely, reattach the hose and clamp, carefully slide the dishwasher back, and restore power. Run a drain cycle to test your work.
Confirming a Dead Motor with a Multimeter
If you heard silence during the drain cycle, your motor is likely burned out. You can confirm this with a multimeter, a simple tool for testing electrical continuity.
- Access the Pump.Follow steps 1-4 above to access the underside of the dishwasher.
- Disconnect the Wires.The drain pump will have two wires connected to its electrical terminals. Carefully pull these two wire connectors off the terminals.
- Test for Resistance.Set your multimeter to the Ohms (Ω) setting, usually in the 200 range. Touch one probe to each of the two metal terminals on the pump motor.
- A good motorwill give you a reading, typically between 4 and 100 ohms. This means the electrical circuit inside is complete.
- A bad motorwill give you a reading of infinity (often displayed as “OL” for “overload”) or show no change at all. This means the circuit is broken, and the motor is officially dead.
- Decide on Repair or Replace.If the motor is dead, the entire drain pump assembly must be replaced. This is a part you can order online, and if you were able to access the pump for testing, you can likely complete the replacement yourself.
Safety Guardrails & What Common Advice Gets Wrong: If you are not 100% comfortable working with electrical wiring or testing, this is the time to call a professional appliance technician. A multimeter is a simple tool, but electrical safety is paramount.
Furthermore, if you test the pump and it shows continuity (it’s not burned out), but it still won’t run and isn’t jammed, the problem may lie with the dishwasher’s main control board—a repair best left to a professional. Respecting your limits is the smartest part of any DIY repair.
Author Bio of Why Is My Bottom of dishwasher full of water:
Alex Carter is a former certified appliance repair technician with over 15 years of hands-on experience diagnosing and fixing home appliances. After personally troubleshooting thousands of dishwasher drainage problems, from simple clogs to complex motor failures, Alex turned his focus to empowering homeowners.
He is now a lead technical writer specializing in creating clear, practical, and safe DIY repair guides. His mission is to demystify the machines we rely on every day, helping people save money and gain the confidence to handle common household fixes. When he’s not meticulously testing repair steps, he’s teaching his own kids the right way to load a dishwasher.
Research Methodology
The information in this guide is not based on theory; it’s a synthesis of extensive, real-world data. Our process involves a deep forensic analysis of common failure points reported across dozens of authoritative sources.
We cross-reference information from professional repair manuals, community-driven forums like Reddit’s r/appliancerepair and r/homeimprovement, and expert-vetted resources like This Old House, The Family Handyman, and InspectAPedia.
Every symptom is mapped to a likely cause, and every solution is vetted for clarity, safety, and effectiveness for a DIY homeowner. This multi-source approach ensures our advice is not only accurate but also reflects the practical challenges and successes of real people fixing their own appliances.
Editorial Policy
Our core mission is to provide trustworthy, accurate, and empowering information. The content in this guide is independently researched and written by subject matter experts with verifiable field experience.
We do not accept payment for product endorsements, and our recommendations are based solely on diagnostic best practices. Your safety is our absolute priority. Any step that carries a significant risk of injury or property damage if performed incorrectly is clearly marked, and we will always advise calling a qualified professional.
When a repair is beyond a safe DIY scope. While we make every effort to ensure our guides are comprehensive and precise, all repairs are performed at your own risk.
Maintenance Checklist
- Protect Your Pump:The best maintenance is prevention. Scrape plates thoroughly to keep hard objects like bones, pits, and glass out of your dishwasher.
- Secure Small Items:Place small plastic items, like bottle caps or lids, in a secured basket so they cannot fall to the bottom of the tub and enter the pump.
- Listen to Your Machine:Pay attention to new or unusual sounds. A new grinding or humming noise is a warning sign that should be investigated before a complete failure occurs.
People Also Ask (FAQs)
- Is it worth replacing a drain pump, or should I just buy a new dishwasher?
It depends. A new drain pump typically costs between $30 and $70 and is a very manageable DIY repair for many people. A professional repair might cost $150-$250. If your dishwasher is otherwise in good shape, replacing the pump is far more cost-effective than buying a new appliance. - My dishwasher drains, but then some dirty water flows back in. What causes that?
This is a classic symptom of a failed check valveor an improperly installed drain hose without a high loop. The check valve is a one-way flap that is often part of the drain pump assembly. If it’s stuck open, dirty water from the drain hose can flow back into the tub after the pump shuts off. Ensure your drain hose has a high loop first; if it does, you may need to replace the drain pump/check valve assembly. - Can I replace the drain pump myself?
Yes, it is a common DIY repair. If you were able to follow the steps to access the pump for testing, you are likely capable of replacing it. It is typically held in place by a few screws or a retaining clip. Just be sure to order the exact replacement part for your dishwasher model. - How much does a professional drain pump repair cost?
On average, you can expect to pay between $150 and $250 for a professional to diagnose and replace a faulty drain pump. The cost varies based on your location and the brand of your dishwasher. - Could the problem be the main control board?
While possible, it is highly unlikely. The main control board is the computer that runs the dishwasher. A failure here is rare and usually presents with other symptoms, like the dishwasher not starting at all or having unresponsive buttons. Always rule out the filter, hose, and pump first, as they account for over 99% of drainage issues. - How often should I clean my dishwasher filter?
For an average family, cleaning it once a month is a good rule of thumb. However, if you wash dishes daily, have a large family, or don’t scrape plates, you should check it every one to two weeks. - What happens if I run the dishwasher without the filter?
Do not do this. Running the dishwasher without the filter allows food debris, glass shards, or other hard objects to go directly into the drain pump. This can jam or destroy the pump’s impeller, leading to a much more expensive and complicated repair. - Is a little bit of water in the bottom of the dishwasher normal?
Yes, a small amount of water (typically a cup or two) remaining in the sump area where the filter sits is normal. This is by design to keep the seals and gaskets from drying out and cracking between cycles. However, if the water level is above the filter or covering the bottom of the tub, you have a drainage problem. - Water is coming out of the little chrome thing on my sink. What is that?
That is the air gap. It’s a safety device to prevent sink water from contaminating your dishwasher. If water is coming out of it, it means there is a clog in the tube that runs from the air gap to your garbage disposal. Follow the steps above to disconnect and clean that tube. - My drain hose seems clean, but the dishwasher still gurgles and drains slowly. What’s next?
If the filter is clean and the entire drain hose path is clear, you may have a problem with the drain pump itself. This could be a clog inside the pump or a failing motor. - Can I just replace the drain hose?
Yes. Dishwasher drain hoses are inexpensive and available at any home improvement store. If your hose is very old, brittle, or seems permanently grimy, replacing it is an excellent and easy way to ensure a clear drain path for years to come.